Origins and Risks

The origin of my photography career is different than most. It wasn’t a camera that I made images on the first time, it was an electron microscope. The images were captured on film. I processed the negatives, used an enlarger to transfer the negative image to photographic paper, and developed that image using chemicals in a dark room. This was in 1995. Eventually I went on to image DNA, using dyes. The technology went digital a few years later, and I was still creating images of the world you cannot see.
In 2004, I got married to a man that spent a great deal of time directing theater productions. I would sit-in during rehearsals, in-part because this was one of the few ways to actually see him. In the process, I discovered the very interesting world of actors and started creating images of this new world. This brought my head up from my microscope, out into the world where everyday things became interesting and worthy of exploration through imagery.
Your wedding, your family, your anniversary, birthday, adventures in auditioning, pregnancy, birth, you name it - all fascinating. As are you, as a person. Your life is a story and photography is the perfect medium in which to tell it. I now spend my time learning new ways to tell stories, either by using new lighting, photography, or editing techniques. Much of each year is dedicated to learning new things.
There was a time, when I was creating artwork and displaying it. I had an exhibit in New York and a few throughout Boston and New Hampshire. The part I disliked the most about exhibiting art, was framing the images. I have always felt it creates a barrier between the viewer and the artwork. In addition, in many cases the images can be seen online, how much difference is there seeing the work in person? Of course, it’s different when it’s wedding or family photos. You want those printed and readily available for viewing all the time.
When my husband asked me to take the promotional shots for the latest show he is directing, I happily came up with a concept and location. At the shoot, I spent time constructing every image from lighting, posing and settings on the camera. After hours of careful editing the images were posted online. I was then asked if I wanted to display them during the run of the show. Sure, but I would love for it to be a different experience than what people have already seen. This presented a challenge.
In searching for new ways to experience photographic art, I came across the concept of a “chlorophyll print”. Using light to etch an image onto a leaf. You bet, both halves of my science-artist brain went crazy over this. Unfortunately, I do not have a means to do this at this time. Doesn’t mean I won’t be exploring it. What it lead me to are ways to transfer photos onto wood.
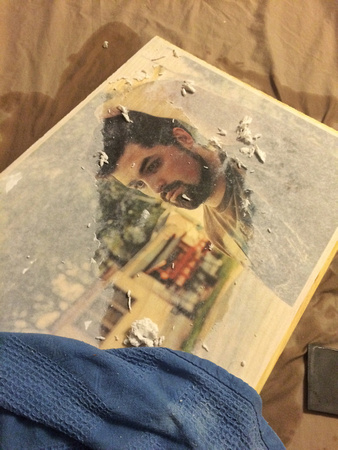
I read many blogs, watched many videos and learned what are the best materials to use for the process. I also thought about how I wanted the finished product to look. The images were created for a production of Killer Joe. A story about a family - already tattered - being torn to pieces by a visit from a guy named Joe. The images I captured convey the mood of each character. The way they are captured and edited adds to that imagery. Transferring the images to wood gives me the opportunity to make my carefully constructed images look tattered. This can be done in any number of ways that would allow me control of the process, but I had already had so much control. What would happen if I just left it to chance?
I used a gel medium that tends to give bubbles during the transfer process. Instead of using foam brushes, the way everyone recommended, I used one with Taklon bristles. I was mostly careful to cover the wood evenly with gel medium, but I left some areas with excess. The result are images with portions not completely transferred, or buried under paper. Pretty tattered, pretty messy, just like the set you will see for this production of Killer Joe.
Giving up control bothered me. I almost canned the whole project, but then I remembered what the overall goal was and let it go. I think this entire process has been hugely beneficial for my growth as an artist. I will continue to use this method, with plans to make it more interactive in the future.
Here are a few photos of my work along the way. Check out the finished product during the run of Killer Joe at The Players’ Ring, October 16th through November 1st.


It begins. A pile of wood, 12" by 17" purchased from Home Depot. It was originally one board that they cut down to size for me. I went with light colored wood that still had enough character to boldly show rings and natural marks. These darken and show more after being processed. The photos were printed using a laser printer on cheap 11" x 17" paper. That size paper tends to run heavier than what you can find for 8.5" x 11". It is probably about 20lbs. Smaller sizes can be as low as 18lbs, which will come off better in processing. The image on the board in front was an experiment using only Mod Podge for the entire process. It has an interesting look, but I went with the suggested process in the video linked above.

The materials you will need. To do this with less bubbles you will need to use foam brushes instead of the ones shown here. You should also shy away from the matte version of this particular brand of gel medium. It causes lots of bubbles. For instructions on how to do wood transfers, watch this video. This blog will only provide additional tips and deviations.

Then comes the sanding. I could have sanded more, but left it a bit rough, especially on the sides.
This particular board, was baked at 175 degrees for 20 minutes. This board did not warp and the paper came off much easier. The other boards were allowed to dry overnight. I will stick with baking in the future.

The remainder of the boards, after 2 rounds of Mod Podge, baking for 15 minutes at 175 for each round, have a little bit of a warp to them.